1. ORM
- ORM(Object-Relational Mapping)은 객체 지향 프로그래밍 언어와 관계형 데이터베이스 간 데이터 상호 작용을 단순화하는 기술입니다.
- 이를 통해 데이터베이스와 코드를 연결하는 작업이 간편해지고, 코드를 더 읽기 쉽게 만들어줍니다.
- 성능 및 복잡한 쿼리 작성 문제에 대한 고려가 필요하다는 단점이 있습니다.
- Node.js ORM 라이브러리에는 Sequelize, Bookshelf, Prisma 등이 있는데, 저는 Sequelize를 사용해 보려고 합니다.
2. DB 세팅
- 데이터베이스를 연결시키기전에 데이터베이스 서버를 띄우고 샘플 데이터를 import하는 사전작업이 필요합니다.
- DB는 MySQL를 사용하려고 하는데, Docker를 이용해서 서버를 띄웠습니다. 자세한 내용은 아래 제 블로그를 참고해주세요.
https://devjeong-note.tistory.com/52
Chapter1 - 설치 및 실행
안녕하세요 개발자 정씨입니다. 애플리케이션의 신속한 배포 및 스케일링, 개발 환경 일관성 보장 등으로 Docker의 중요성이 올라가고 있습니다. 저 나름대로 Docker를 공부해보고 이를 정리하고자
devjeong-note.tistory.com
- 샘플데이터로 뭐가 좋을까 검색해보던 도중 MySQL 공식 문서와 다양한 학습 리소스에서 사용하는 Sakila라는 샘플 데이터를 찾았습니다.
- 해당 데이터를 https://dev.mysql.com/doc/index-other.html에서 다운로드 받아 DB에 import 했습니다.
3. Sequelize 설치 및 세팅
- 우선 npm을 이용해 Sequelize와 mysql2(종속 모듈)를 설치해줍니다.
npm install sequelize mysql2
- 아래와 같이 구조를 수정하여 DB Connect part를 모듈화할 계획입니다.
main-server/
|-- app.js
|-- api/
|   |-- customer/
|   |   |-- customerController.js
|-- lib/
|   |-- DBClient.js
|-- package.json
- 그리고 아래와 같이 DBClient.js를 작성합니다.
const { Sequelize } = require('sequelize');

const sequelize = new Sequelize({
  dialect: 'mysql',
  host: 'localhost',
  port: 3306,
  username: 'root',
  password: '1q2w3e4r!',
  database: 'sakila',
});

module.exports = sequelize;
4. Model생성 및 Route 적용
- sakili의 DB 구조는 아래와 같습니다
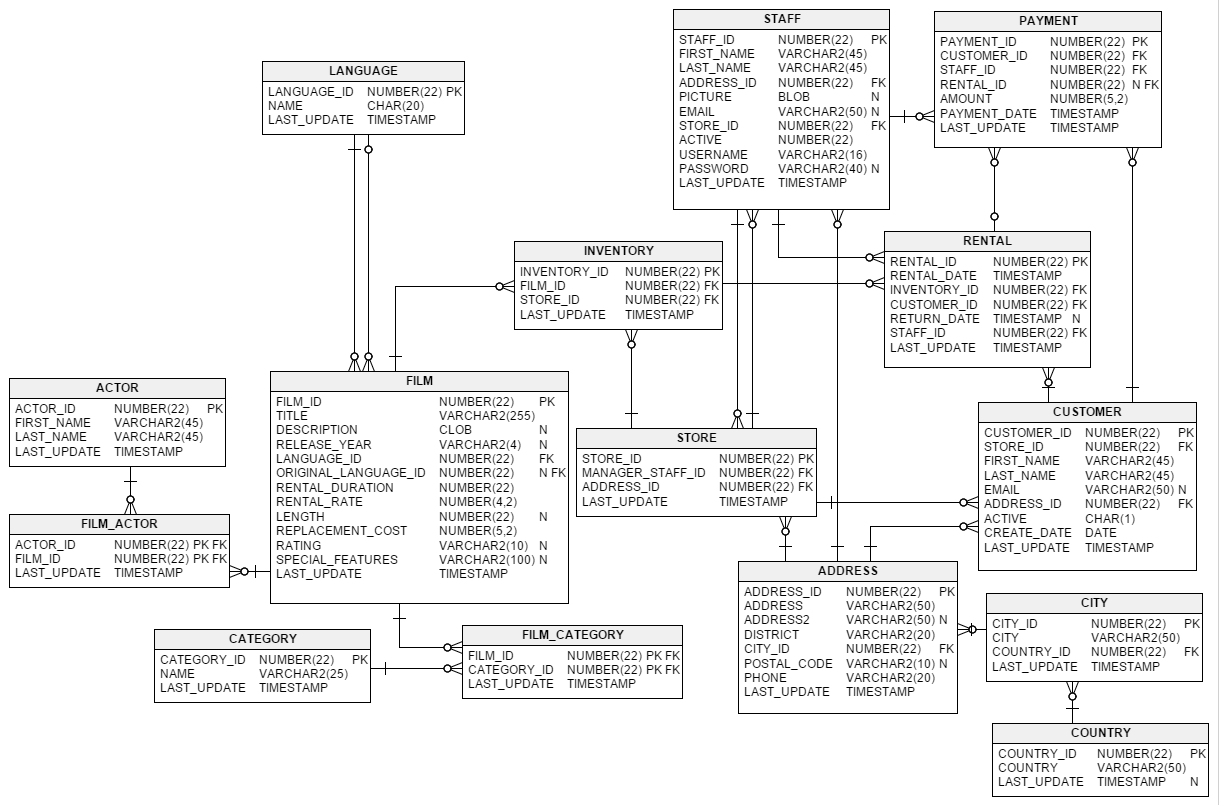
- 이중 customer table에 대한 model을 생성하려고 합니다.
- model생성과 controller와 service레이어 분리를 위해 아래와 같이 디렉토리 구조를 변경하였습니다.
main-server/
|-- app.js
|-- api/
|   |-- customer/
|   |   |-- customerController.js
|   |   |-- customerService.js
|-- lib/
|   |-- model/
|   |   |-- customerModel.js
|   |-- DBClient.js
|-- package.json
- 우선 model에 대한 코드는 아래와 같이 작성하였습니다.
const { DataTypes } = require('sequelize');
const dbClient = require('../DBClient');

const Customer = dbClient.define('Customer', {
    customer_id: {
        type: DataTypes.INTEGER,
        allowNull: false,
        primaryKey: true,
        autoIncrement: true,
    },
    store_id: {
        type: DataTypes.INTEGER,
        allowNull: false,
    },
    first_name: {
        type: DataTypes.STRING,
        allowNull: false,
    },
    last_name: {
        type: DataTypes.STRING,
        allowNull: false,
    },
    email: {
        type: DataTypes.STRING,
        allowNull: true,
    },
    address_id: {
        type: DataTypes.INTEGER,
        allowNull: false,
    },
    active: {
        type: DataTypes.INTEGER,
        allowNull: false,
        defaultValue: 1,
    },
    create_date: {
        type: DataTypes.DATE,
        allowNull: true,
    },
    last_update: {
        type: DataTypes.DATE,
        allowNull: true,
    },
}, {
    tableName: 'customer',
    timestamps: false,
});

module.exports = Customer;
- 그리고 controller는 이전에 다뤘던 RESTful API 디자인패턴 내용을 토대로를 작성해보았습니다.
const express = require("express");
const customerService = require("./customerService");

const router = express.Router();

// 모든 고객 정보 가져오기
router.get("/v1/customer", async (req, res) => {
  try {
    const customers = await customerService.getAllCustomers();
    res.json(customers);
  } catch (error) {
    console.error(error);
    res.status(500).send("Internal Server Error");
  }
});

// 특정 고객 정보 가져오기
router.get("/v1/customer/:customerId", async (req, res) => {
  const customerId = parseInt(req.params.customerId, 10);

  try {
    const customer = await customerService.getCustomerById(customerId);
    if (!customer) {
      res.status(404).send("Customer not found");
      return;
    }
    res.json(customer);
  } catch (error) {
    console.error(error);
    res.status(500).send("Internal Server Error");
  }
});

module.exports = router;
- 마지막으로 위에서 작성된 model을 require하여 service 코드를 작성하였습니다.
const Customer = require("../../lib/model/customerModel");

const getAllCustomers = async () => {
  try {
    const customers = await Customer.findAll();
    return customers;
  } catch (error) {
    throw new Error("Error getting customers:", error);
  }
};

const getCustomerById = async (customerId) => {
  try {
    const customer = await Customer.findByPk(customerId);
    return customer;
  } catch (error) {
    throw new Error("Error getting customer by customerId:", error);
  }
};

module.exports = {
  getAllCustomers,
  getCustomerById,
};
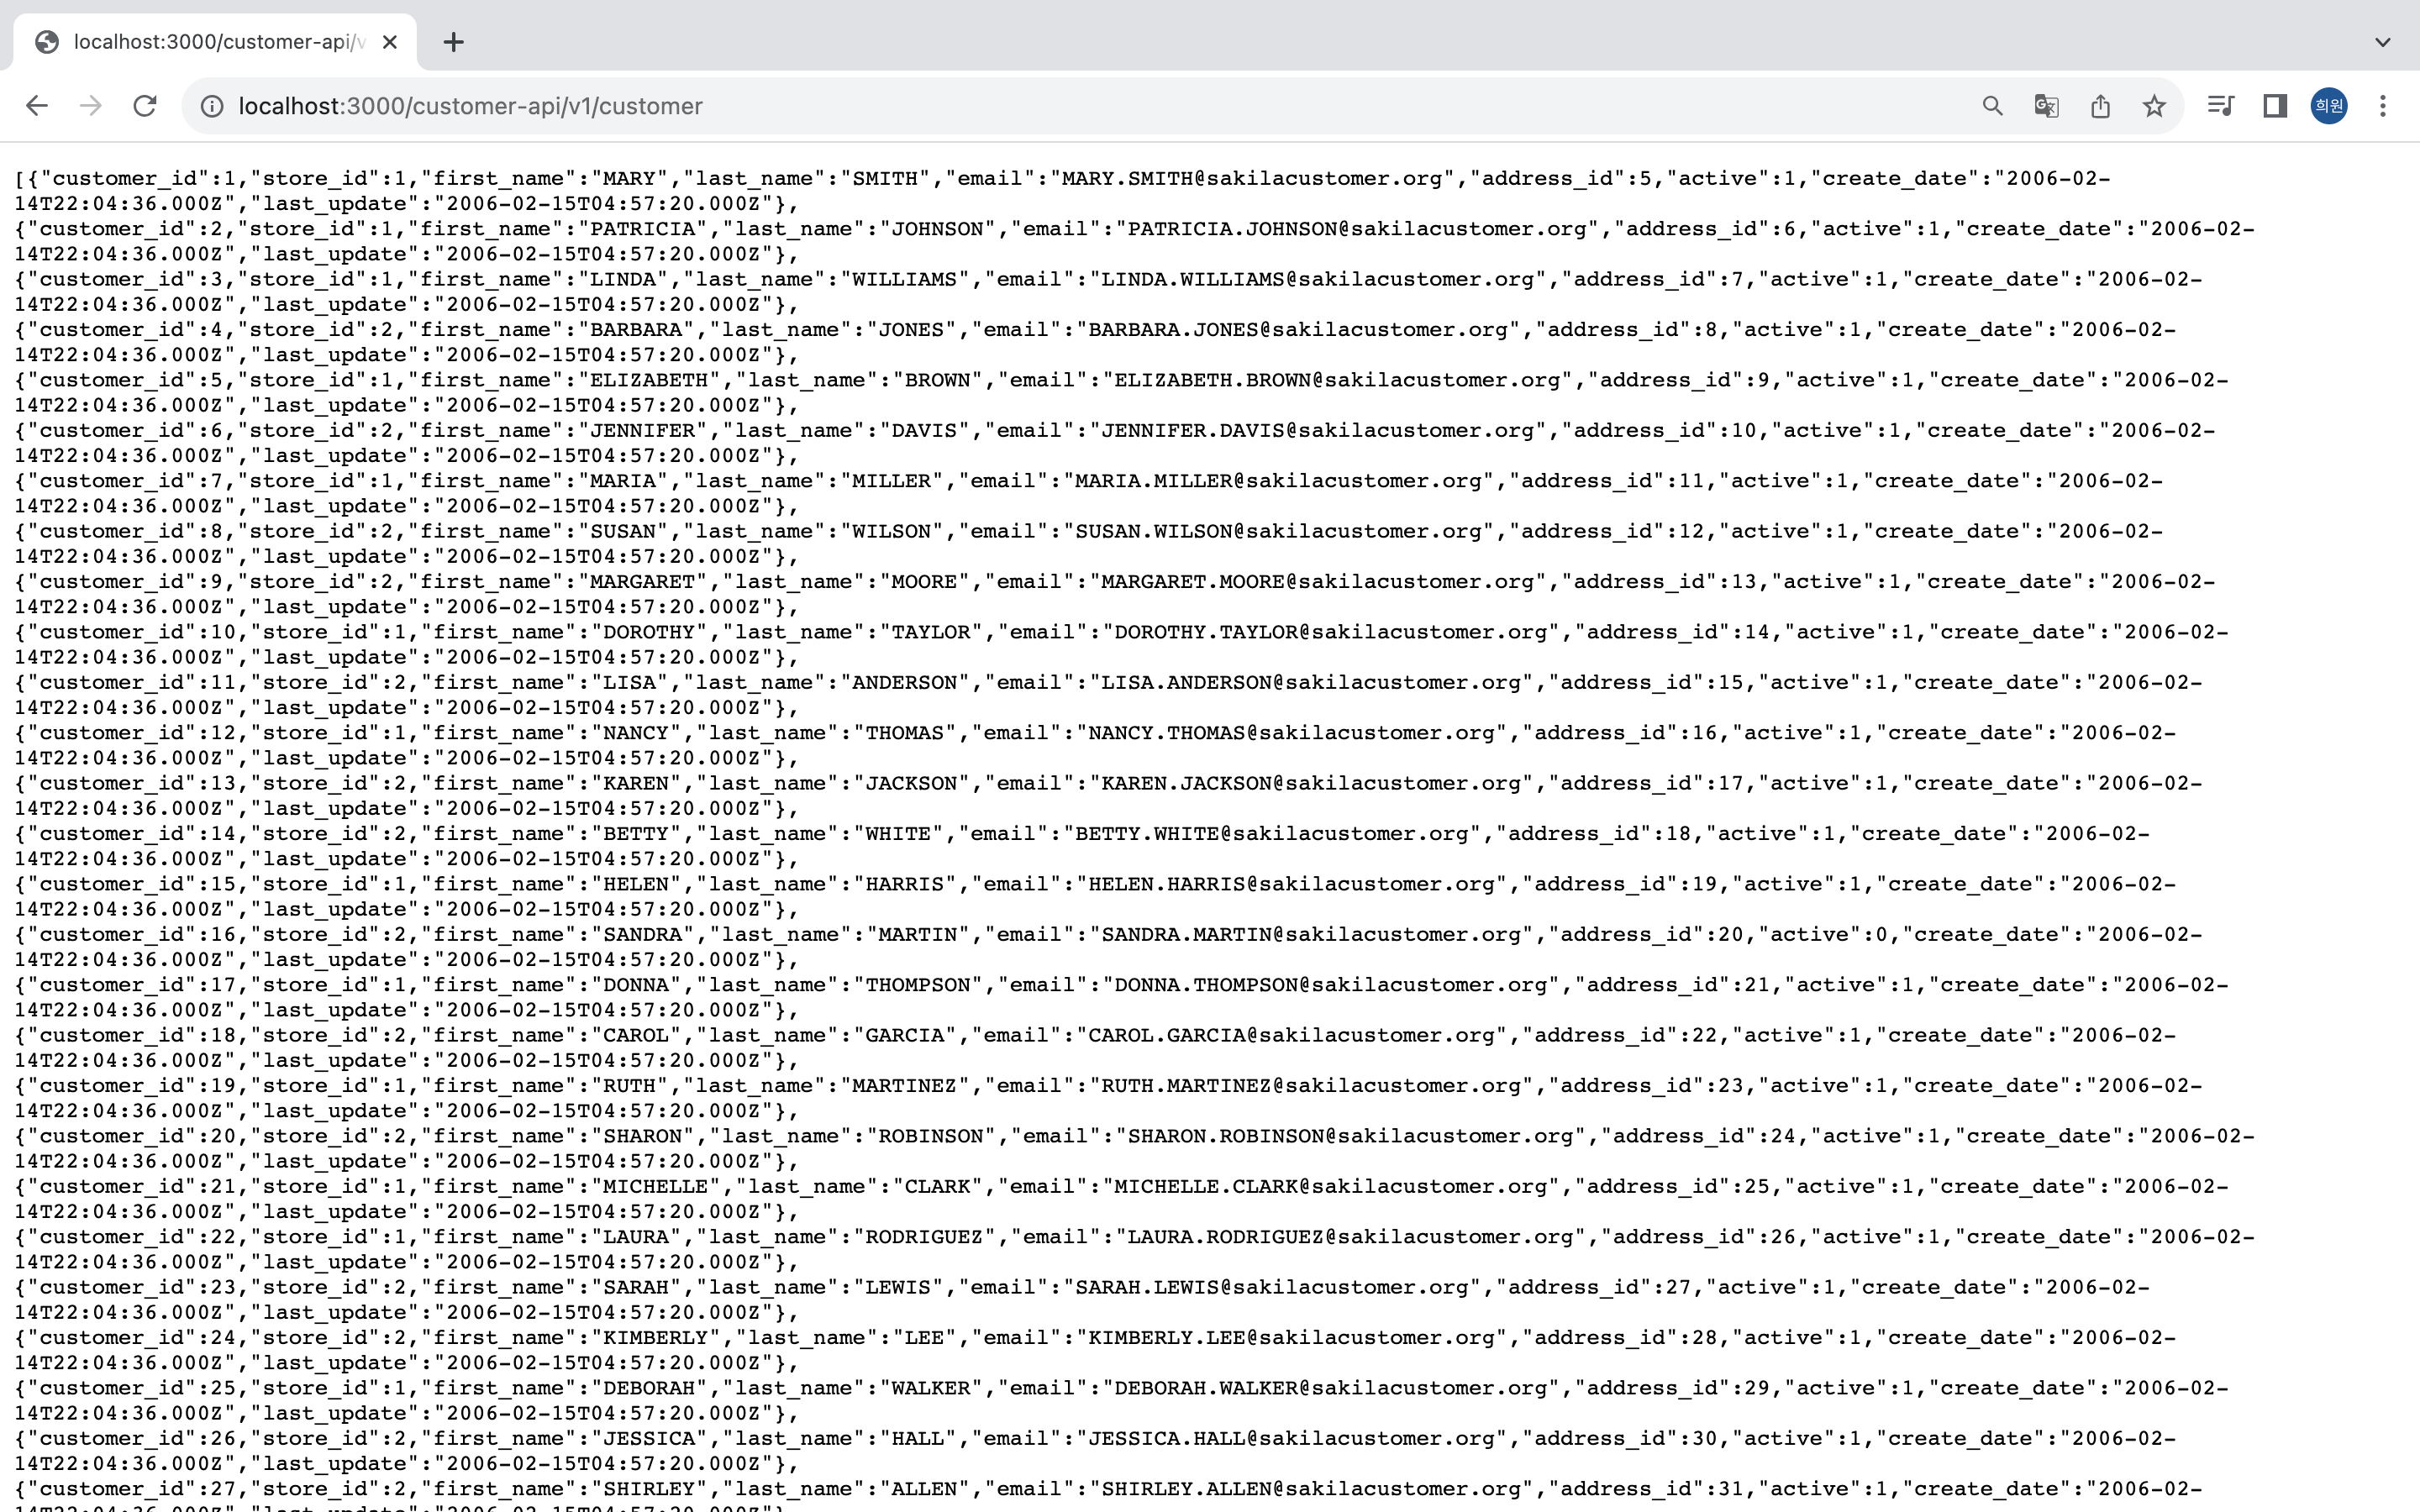
- "/customer-api/v1/customer"로 접속해보면 전체 customer 정보를 정상적으로 가져오는 것을 확인 할 수 있습니다.
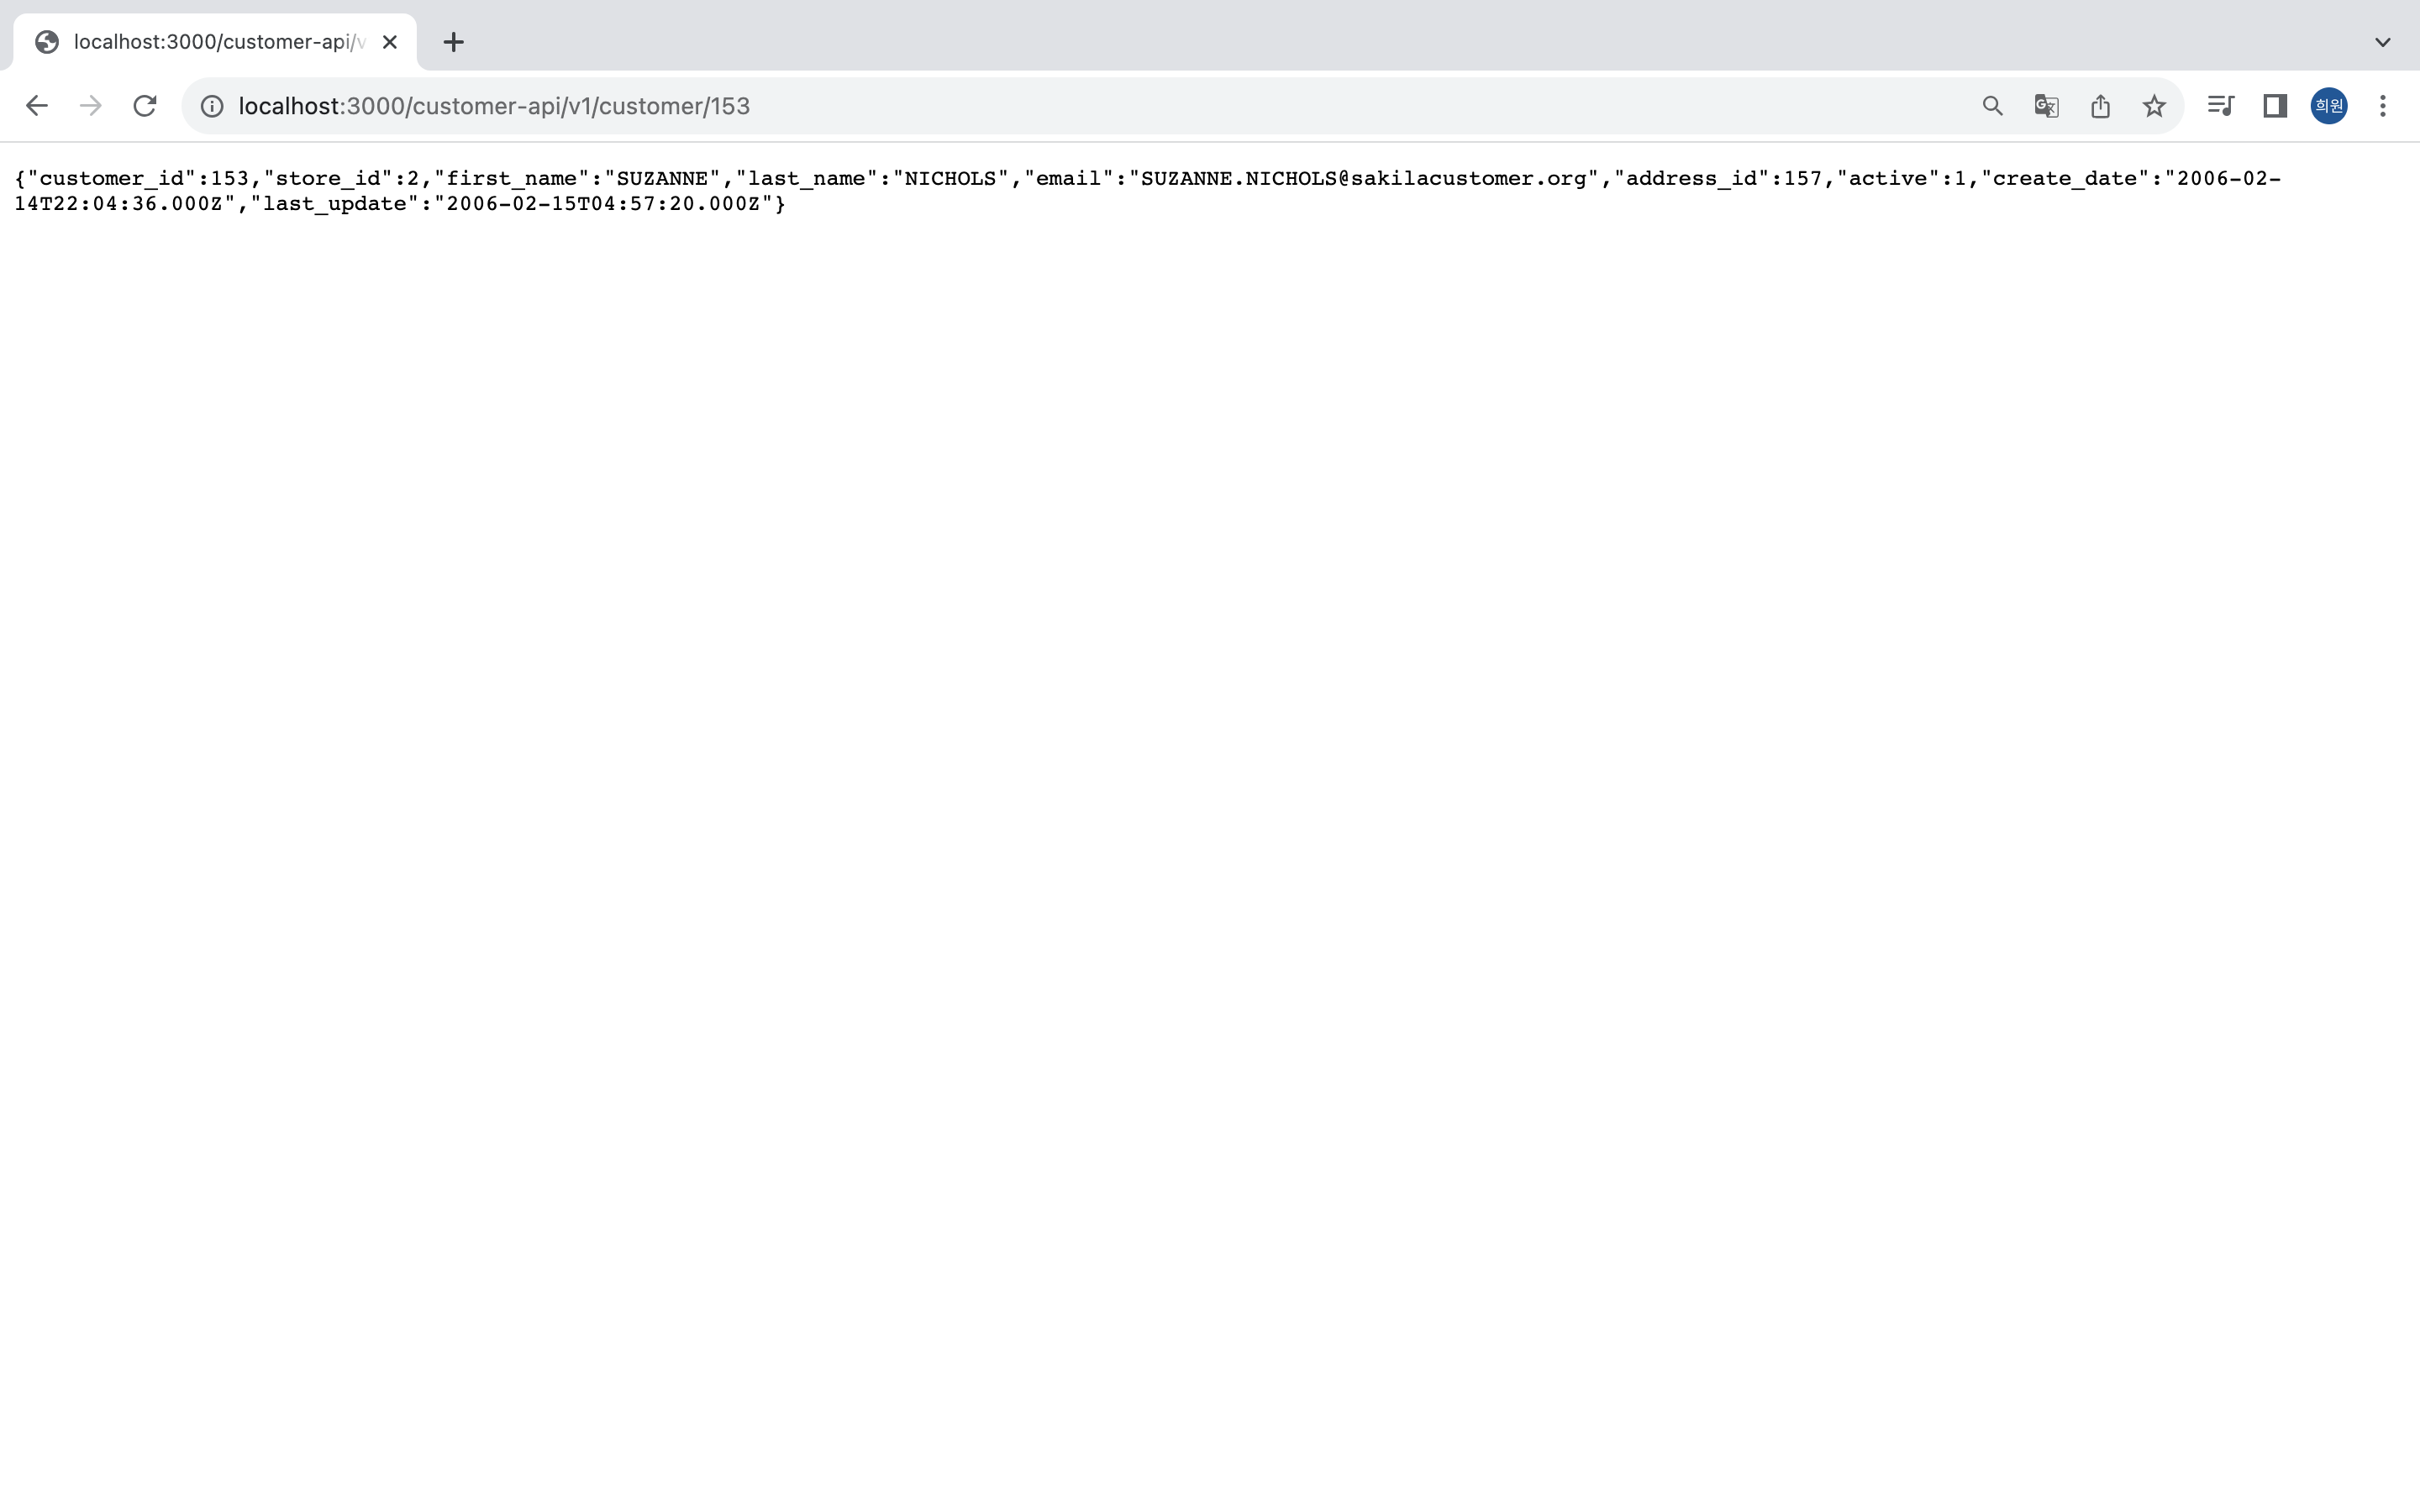
- 또한, "/customer-api/v1/customer/:customerId"를 통해 개별 customer정보를 가져올 수도 있습니다.
'ExpressJS' 카테고리의 다른 글
| Chapter5 - Session & JWT (0) | 2024.01.28 |
|---|---|
| Chapter4 - Redis (0) | 2023.11.20 |
| Chapter2 - 프로젝트 구조 (0) | 2023.09.17 |
| Chapter1. 프로젝트 생성 (0) | 2023.09.01 |